Zelda Style Life System Unity Tutorial – Part 2 of 10

The end result of the full tutorial.
At the end of Part 5 we will have produced this (See image 1.0).

Image 1.0
Before you start you should know these things:
You should have gone through and completed ‘Part 1’ of this tutorial before going any further. If you find yourself not understanding some of the terminology or code of the tutorial I would also recommend going through the previous tutorial to get up to speed. I will leave a link to it below to go through at your leisure.
http://joseph-easter.blogspot.co.uk/2016/08/zedla-style-life-system-unity-tutorial.html
If you follow this tutorial and find I am moving too fast or if you don’t know the things in the list above, I would recommend getting up to speed and then come back to this tutorial when you are ready.
Links to Parts 1 - 10 of this tutorial series:
Part 1
Part 3
Part 4
Part 5
Part 6
Part 7
Part 8
Part 9
Part 10
With this tutorial if you want to convert this into JavaScript by all means do so but it may be easier for you to follow this in C# and stick with the language of the tutorial to make it easier.
PROJECT RESOURCES: At the bottom of the post there is a download link to a zip file. This files includes all files needed to follow Part 2 and the completed project file of Part 2.
This tutorial will be split up into several parts. In this part we wIn this part we will work on completing the foundations:
- Create an image prefab and assign it in the inspector
- Instantiate said image as an Image GameObject
- Parent it to the ‘lifeSystemManager’ GameObject connected to the Canvas
Set the RectTransform position if the image to the top left corner of the screen (where the manager is)
Set the size and rescale the instantiate intend image
Step 1:
In the first step we need to do two things. Because we are dealing with the uGUI classes and the Image class we need to include a reference to the name space in the ‘LifeSystem’ class. We do this because other wise the class and compiler will not know what we are talking about and won’t know where to look when referencing the classes and associated functions.
At the top, just below we reference the to the UnityEngine UI namespace code library.
Code:
using UnityEngine;
using UnityEngine.UI;
using System.Collections;
Then we need to add an ‘Image’ variable to reference our uGUI image Prefab. We put this under our float variables from Part 1.
Code:
public Image lifeImg;
Step 2: - Setting Up the Prefab
Next up we need to create our Image Prefab. Create an Image gameObject from the UI section of the ‘Create’ drop down menu. Rename the gameObject to ‘LifeImage’ and create a prefab of it or turn it into a Prefab. Delete the ‘LifeImage’ that is in the Scene view but keep the one in the ‘Project’ view. To keep everything organised in the ‘Assets’ folder create a folder called ‘Prefabs’ and put the ‘LifeImage’ prefab in there. (See figure 1.0)

Figure 1.0
A simple image UI object (left). ‘LifeImage’ prefab located in its folder.
Now you are probably thinking ‘why have we not added an image to this object yet?’. Well because it’s not needed yet and we will stick to the place holder image for the moment. We will add an image to it later on.
With the ‘LifeImage’ prefab in the ‘Prefabs’ folder in the project view, drag it into the ‘LifeImg’ variable of the ‘LifeSystem’ script in the inspector attached to the ‘LifeSystemManager’. Make sure the ‘LifeSystemManager’ game object is selected in the scene view and its components are visible in the inspector.
Step 3: - Instantiate the Image Game Object
The next thing we need to do is create an Image game object at run time in the Start method (we do this for now so it only runs once and to see the results quickly). Because we are creating a UI element we want to create a UI object (specifically an image object) and not a normal game object. This is pretty easy to do. It’s just like Instantiate a normal ‘gameObject’.
When we create a temporary variable in our code for instantiating a game object instead of writing ‘GameObject tempObject’ we would put ‘Image tempName’. Then at the end of the statement instead of casting it as a ‘gameObject’ we cast it as an ‘Image’.
Code:
void Start ()
{
GetScreenDimentions();
SetImageSize();
Image tempImg = Instantiate(lifeImg,
transform.position,
transform.rotation) as Image;
}
Now if we run the code as it is this happens.

Figure 1.1
This is because the object is not a Child of the Canvas and is being treated like a normal game object and created in world space. This is not just because it’s out of the camera view either. It happens because you can only see UI objects when they are a Child of a Canvas, then they are rendered by the Camera in Play mode. This requires a simple fix.
Code:
void Start ()
{
GetScreenDimentions();
SetImageSize();
Image tempImg = Instantiate(lifeImg,
transform.position,
transform.rotation) as Image;
tempImg.transform.parent = transform;
}
Now when we let it compile then press Play, we can see it in the Game view. It’s spawned where the LifeSystemManager object is positioned with in the Canvas because we used ‘transform.position’ and the script it attached the this object. (See figure 1.2)

The newly instantiated image parented to the ‘LifeSystemmanager’.
Now is is all good because we can see the image on screen in Play mode. However, adjust the screen view port and see what happens to the game object in Play mode. Depending on how you adjust the screen it will either not show up, move to a different part of the screen or now show. This is down to how we have set the anchoring of the ‘RectTransform’. Because we want this to work on most screen sizes and resolutions this simply will not do. This however is easy to fix in the inspector and for now we won’t need to write any code to fix it.
In the ‘Scene’ view make sure the ‘LifeSystemManager’ game object is selected. Go to it’s ‘RectTransform’ in the inspector. Click on the ‘anchor presets’ box to the left of the position variables. Click on the top and left option, then place the game object in the top left corner of the canvas, making sure the object is fully inside the canvas so it’s in view. (See figure 1.3)

Anchoring system of the ‘RectTransform’ component.
In your project you may want it positioned differently which is fine, I have done this because most games that use this put thing on the top left, such as Zelda, or they start at the top left depending on the variables they need to show. When we press play, this happens. (See figure 1.4)

The image is more or less where we want it to be. We will refine this later, but at least the foundations are being laid down. You may want to change the width and height of the ‘LifeSystemManager’ game object to make it more compact and position it more precisely. I have done this but it is not required, it us up to you if you do.
Great, part two is finished. We have laid down more foundations to the frame work.
We have learnt:
How to manipulate the RectTransform anchoring system to maintain a UI elements visual integrity
In Part 3 we will learn how to resize the image created during runtime using the variables from part one. We will also learn how to use the ‘Grid Layout Group’ component to size our image and how it can make creating and positioning new multiple images easier with little code. Click here for Part 3.
If you liked this tutorial leave a comment below telling me why you like it and share it with a friend who will find it useful. If you didn’t like it, please leave a comment below saying why.
If you would would like to see more of these tutorials, please leave a comment below. And if you want more of this particular tutorial say what you want to see more of in the comments.
Download resources and project files.
tempImg.transform.parent = transform;
}
Now when we let it compile then press Play, we can see it in the Game view. It’s spawned where the LifeSystemManager object is positioned with in the Canvas because we used ‘transform.position’ and the script it attached the this object. (See figure 1.2)

Figure 1.2
The newly instantiated image parented to the ‘LifeSystemmanager’.
Now is is all good because we can see the image on screen in Play mode. However, adjust the screen view port and see what happens to the game object in Play mode. Depending on how you adjust the screen it will either not show up, move to a different part of the screen or now show. This is down to how we have set the anchoring of the ‘RectTransform’. Because we want this to work on most screen sizes and resolutions this simply will not do. This however is easy to fix in the inspector and for now we won’t need to write any code to fix it.
In the ‘Scene’ view make sure the ‘LifeSystemManager’ game object is selected. Go to it’s ‘RectTransform’ in the inspector. Click on the ‘anchor presets’ box to the left of the position variables. Click on the top and left option, then place the game object in the top left corner of the canvas, making sure the object is fully inside the canvas so it’s in view. (See figure 1.3)
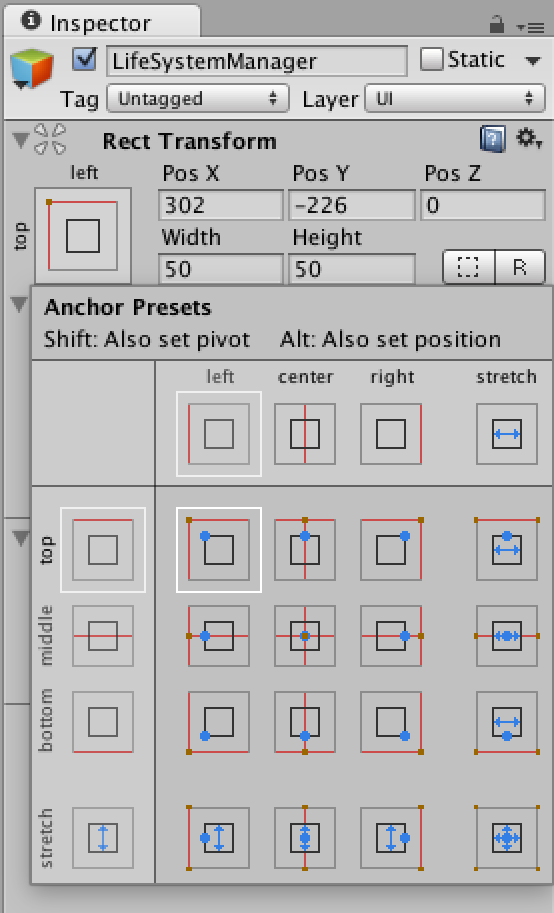
Figure 1.3
Anchoring system of the ‘RectTransform’ component.
In your project you may want it positioned differently which is fine, I have done this because most games that use this put thing on the top left, such as Zelda, or they start at the top left depending on the variables they need to show. When we press play, this happens. (See figure 1.4)

Figure 1.4
The image is more or less where we want it to be. We will refine this later, but at least the foundations are being laid down. You may want to change the width and height of the ‘LifeSystemManager’ game object to make it more compact and position it more precisely. I have done this but it is not required, it us up to you if you do.
Great, part two is finished. We have laid down more foundations to the frame work.
We have learnt:
- How to create an ‘Image’ variable and reference Unity’s UI library namespace
- How to Instantiate an image object at runtime in the same way we would a game object
- A UI game object that is not a child of a canvas is not visible in Play mode to the player
- How to make the instantiated image a child of the canvas
- How to maintain a UI elements position on screen in a canvas regardless of screen resolution
How to manipulate the RectTransform anchoring system to maintain a UI elements visual integrity
In Part 3 we will learn how to resize the image created during runtime using the variables from part one. We will also learn how to use the ‘Grid Layout Group’ component to size our image and how it can make creating and positioning new multiple images easier with little code. Click here for Part 3.
If you liked this tutorial leave a comment below telling me why you like it and share it with a friend who will find it useful. If you didn’t like it, please leave a comment below saying why.
If you would would like to see more of these tutorials, please leave a comment below. And if you want more of this particular tutorial say what you want to see more of in the comments.
Download resources and project files.


